Art Lesson: Painting the Sky

“Lighting up the sky while painting with acrylics can be accomplished with ease,” she said. Until I learned to add acrylic glazing liquid, I would never have thought it so easy.

Clouds can be tricky because in the sky they are forever changing shape, form, color, and detail. In this lesson, we gathered firsthand experience with using the underpainting to our advantage for letting the light shine.

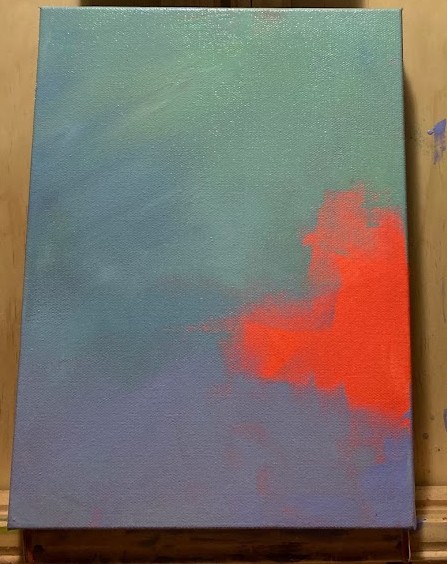
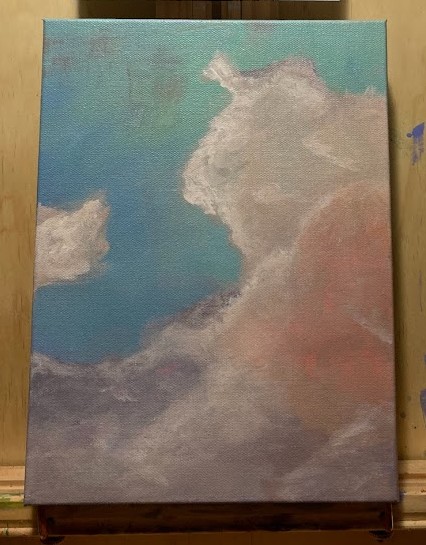
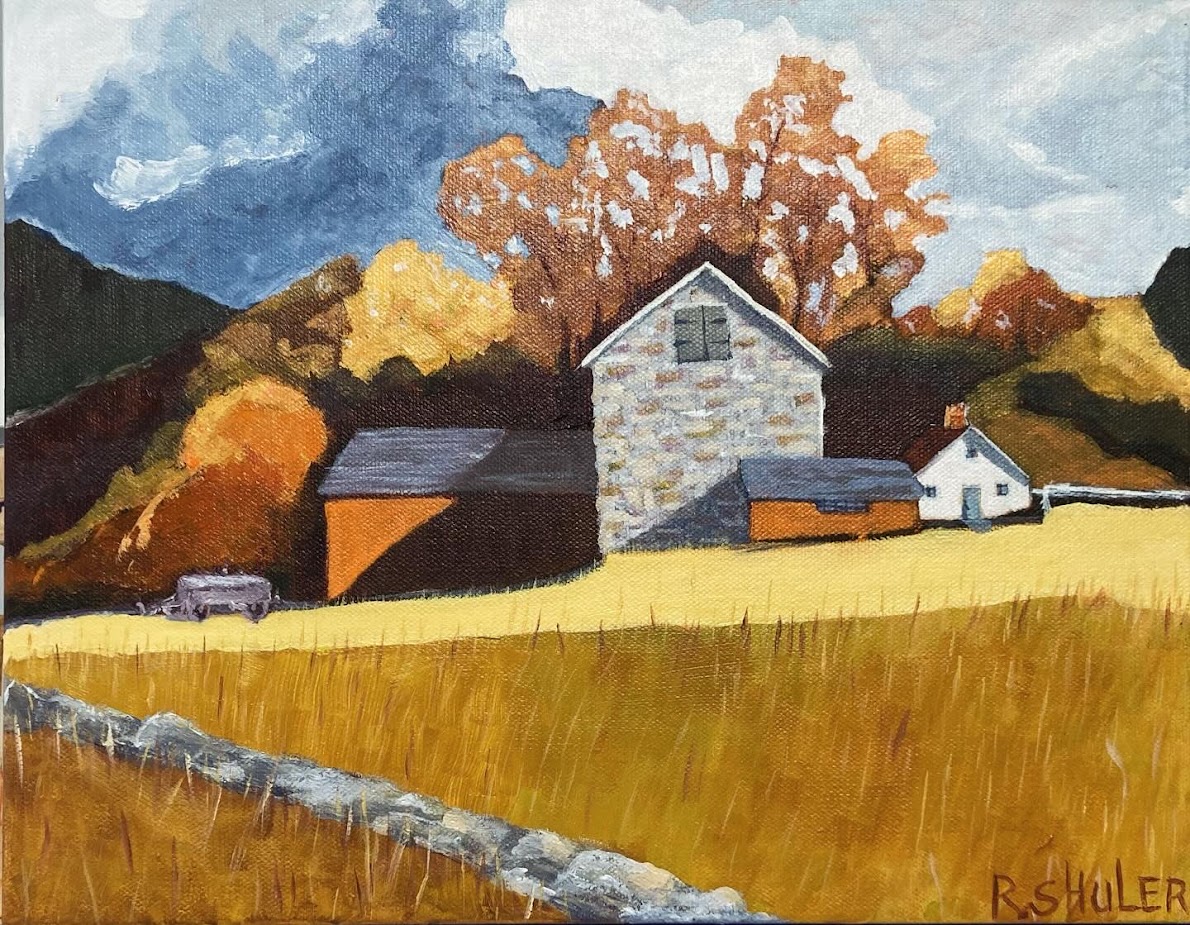
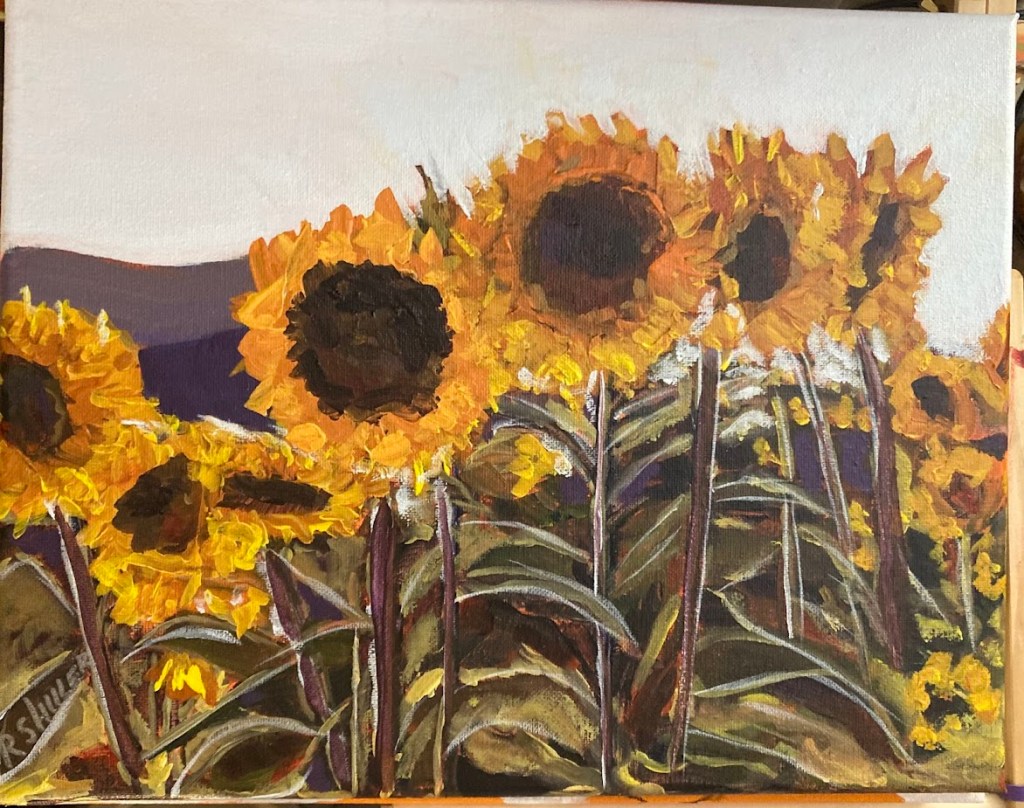
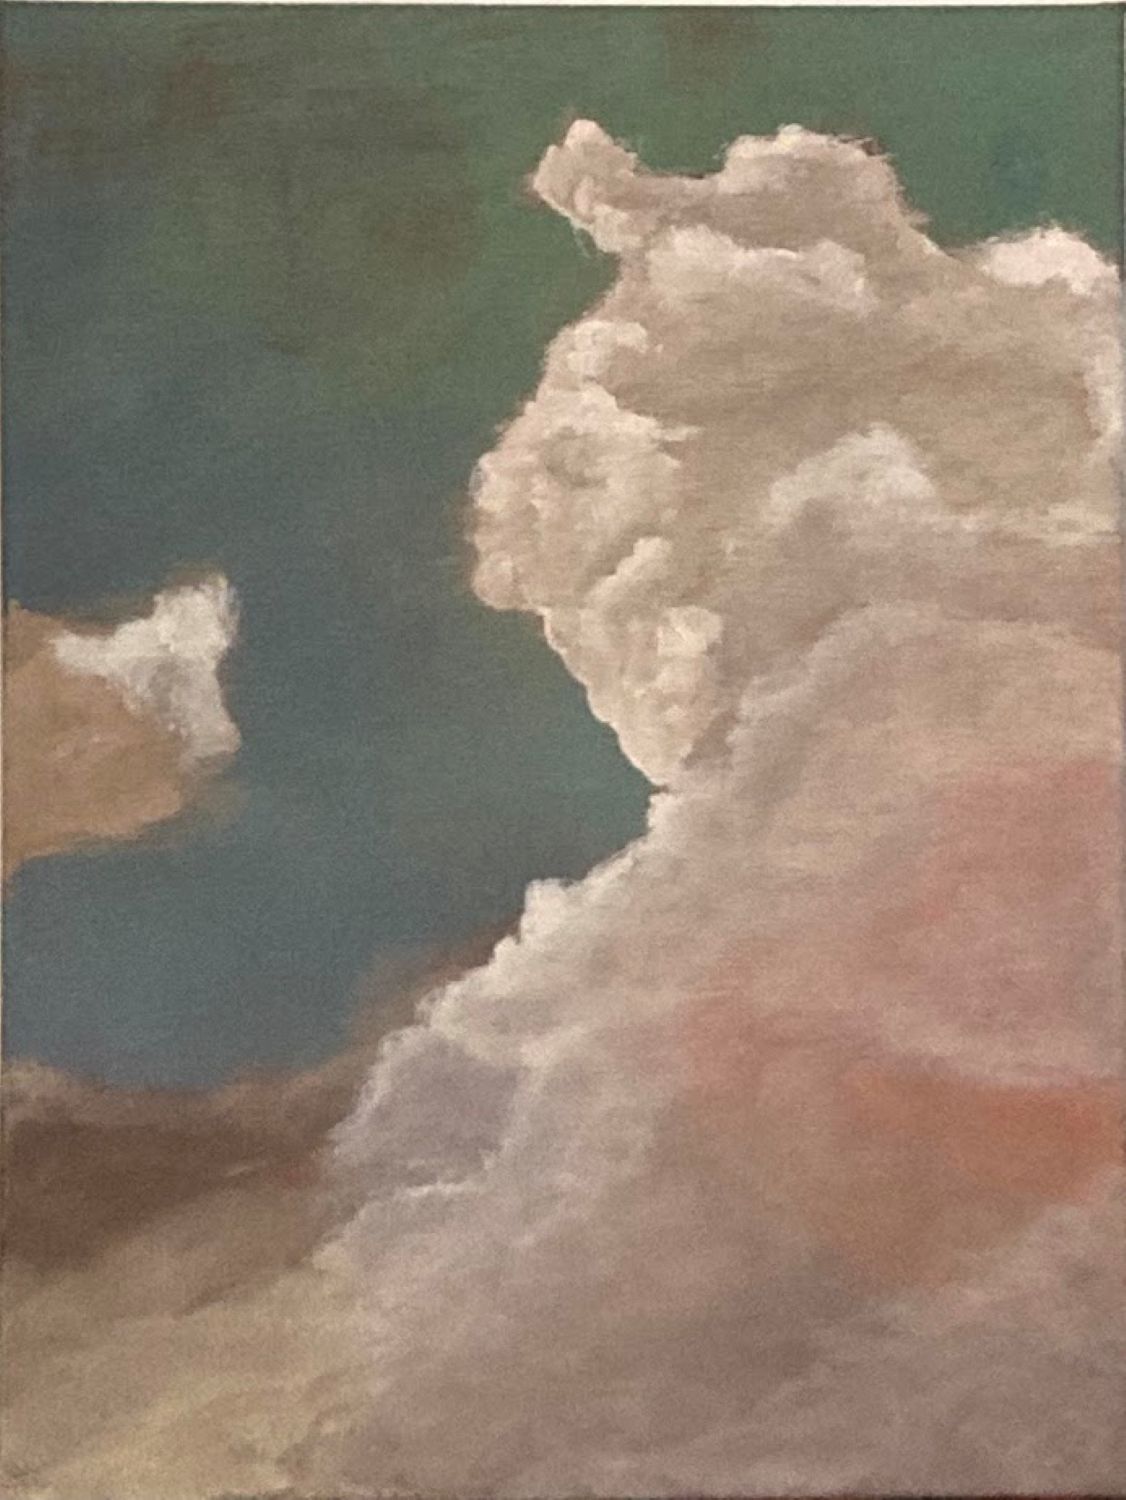
The underpainting for this cloud painting began with a very warm red/orange. Then the blue/green to blue sky was painted over the red/orange underpainting leaving one area about middle right to remain red/orange. Along the lower three inches of this work, a dull purple was used over the red/orange. If you examine the greenish-blue sky tones closely, you can still see some of the red/orange tones. And where the red/orange is covered by clouds in white to creme tones, the glazing liquid was added to the paint, creating a translucent effect.

Overall, the sky becomes lit by a morning sunrise, and the warmth of that experience can be felt in this piece. Demonstrating this technique for lighting up the sky during a recent painting session certainly brought a lot of “a-ha” moments from my students.

This class called: LIGHT UP THE SKY is only one in my repertoire of acrylic painting lessons held monthly at the Gilmer Art Center in downtown Ellijay, Georgia. Stop by in person some Friday to see what we are up to. Or visit the Gilmer Arts Website https://gilmerarts.com/art-gallery/#classes to browse all the art classes on the schedule and follow my Facebook page: https://www.facebook.com/ArtwBecca/events.

1st Photo: red/orange underpainting and blue/green sky underground with underpainting glimpse.

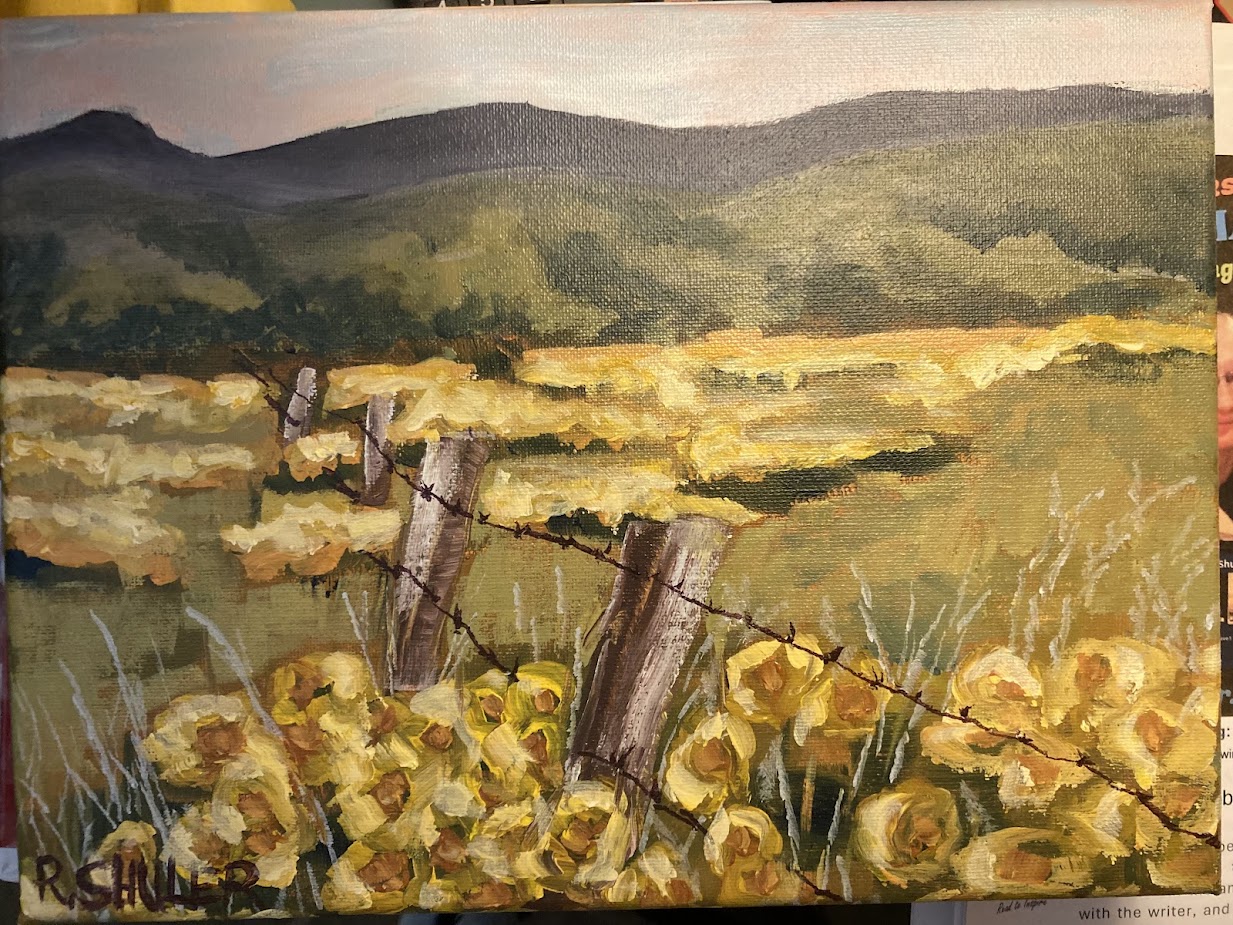
2nd Photo: 2 layers of white clouds painted over the underground using additive: acrylic glazing liquid.

The Jury is Out: Annual Spring Juried Art Exhibit

Annually the local art center in our county, Gilmer Arts, holds a juried art show each spring for local artists. Many different mediums are accepted: 2 D painted, drawn, and mixed media works, photography, and 3 D works of art. The notices have gone out for acceptance into the show, and I am happy to announce I have entered several different paintings this year.

This is my first Juried Art Show even though I was invited to submit pieces into a juried show last year in the town south of us; that show was cancelled due to severe weather. Entering any art show means a lot of preparation work for the artists, the gallery, and those involved with the opening and the judging. During the Opening Reception for the show on Sunday, April 6th, 2025, the winners in each category will be announced at 4:00pm. If you are local, come and enjoy the refreshments as well as meet the artists presenting their works. It will be fun, I promise!

Before, during or after the show you may purchase my artwork. Please feel free to browse my submissions here; each one is available for purchase. If you purchase at the art center during the show, a portion of the proceeds goes to the art center. If you see something you must have but aren’t local, reach out to me here: Art In the Community.

“In the Vines at the Foothills”, 12 x 16 x 1″ acrylics to canvas, local N. Georgia winery: $168

“Winter Cornfields on Macedonia Road”, 14x11x1, acrylics to canvas, local area farm in N. GA.: $190

“Spring House,” 11 x 14 x 2, acrylics to canvas, Birds built a nest in birdhouse at the lake pergola: $ 195

“Monument Valley 1”, 12 x 6 x 1, acrylics to canvas, shadows on red cliffs: $100

“Monument Valley 2”, 8 x 8 x 1, acrylics to wood panel, shadows on red cliffs: $ 90

“Monument Valley 3”, 8 x 8 x 1, acrylics to wood panel, shadows on red cliffs: $ 90

LIGHT UP THE SKY, PART 1, 9 x 12 x 2, acrylics to canvas, billowy clouds at sunrise: $ 160

LIGHT UP THE SKY, PART 2, acrylics to canvas, 10 x 20 x 2, billowy clouds at sunrise: $ 198

FOR THE BIRDS, acrylics to canvas, 20 x 12 x 1, Blue Tananger in forest boughs: $ 190

Landscape Painting Exercises

UNDER THE MADNESS / W. Va. Farm Under a Storm Cloud / Acrylics to Wrapped Canvas / 11 x 14 x 2 / $192

Creating balance in a painting is an exercise I practice each time I paint a landscape. The light that appears in the sky along the edge of the dark angry clouds is reflected on the white farmhouse and on the tips of the grass growing in the field in front. The layers of charcoal gray in gradient were the trickiest parts of the sky, but I’m finally pleased with this result.

The focal point is never in the center; as I try to follow the thirds’ theory for a focal point. I prefer to exclusively place detail in the focal point areas, everything else gets only a suggestion of detail. The addition of light along the edge of the dark clouds falls somewhere in between the details of the buildings and the lack of details in the foliage along the horizon flanking either side of the house.

The madness of the storm cloud brings moodiness to the scene. The rosey haze along the horizon line is repeated in the sky and the foreground, although it’s not obvious. The color palette for this composition was inspired by a painting with similar subject matter under blue skies. (See the last image for the color inspiration.)

TWICE AS NICE / W. Va. Farm in Autumn Under Blue Skies / Acrylics to Wrapped Canvas / 11 x 14 x 2 / $192

See something you wish to purchase or have printed into a greeting card? Send an email request to the artist here: beccasgreencraftstudio@gmail.com

R. Shuler Art at the Jasper Artwalk 2024

R. Shuler the artist aka: Becca of Green Craft Studio

Each piece of art shown will be in the show and available for purchase. You may reserve your piece here with payment using this link, add a note at time of payment with the phrase ARTWALK and the TITLE of the piece: Paypal.me/artworkshop50. If you don’t have paypal, then reach out using the contact form or email the artist here: beccasgreencraftstudio@gmail.com.

Between the Pastures / Framed Panel (16 x16 x 2) / $405
Creme Brulee / Framed Panel (16 x 16 x 2) / $405

Creme Brulee / Framed Panel (16 x 16 x 2) / $405

The Road Home / Acrylics to Pro Birch Panel (18 x 18 x 2) / $405

These Silent Woods / Acrylics to Pro-Birch Panel (18 x 18 x 2) / $405

The Burden is Gone / Acrlics to Pro-Birch Panel (16 x 16 x 1)/ $320

Twice as Nice / Acrylics to Gallery wrapped canvas (11 x 14 x 2) / $192

Under the Madness / Acrylics to wrapped canvas (11 x 14 x 1) / $180

In the Pines / Acrylic to Pro-Birch Panel (8 x 8 x 2) / $96

Glory Sounds / Acrylics to wrapped canvas (11 x 14 x 1)/ $149

SOLD Edgar’s Trees / Acrylics to paper mounted, matted, framed under glass (16×20) / $72

Warm Water’s Edge

Acrylics to paper mounted, matted, framed under glass

(11 x 14)

$52

Rock Solid

(river rocks along a treelined shore)

Acrylics to paper mounted under glass

(6 x 14 x 1)

$49

Rooftops / Acrylics to Birch Panel

(6 x 6 x 1) /

$32

Sheep in the Meadow

(sheep in field w/ windmill)

Acrylics toround wood panel (8″ round x 1″)

$32

Peace Like a River / Landscape

Acrylics to wrapped canvas (12×12)

River rruns through the Blue Ridge

$180

Farmhouse Star Barn Quilt / Folk Art

Acrylics to Purebond Poplar Panel framed (28″ square)

$250

Navy Sunflower Barn Quilt / Folk Art

(painted and sealed and ready for hanging)

Acrylics to Purebond Poplar Panel unframed (24″ square)

$195

SOLD Flora’s Crown / Folk Art Chicken

RESERVED by Cromie, Shane & Alisha

(Alisha’s hen)

Acrylics to paper mounted, matted, & framed under glass (9×9)

$122

Sunny-Side / Landscape

Acrylics to wrapped canvas

(11×14 framed to 16 x 20)

Sunflower rows in mountains of Georgia

$179

Grace Abounds / Landscape

INQUIRY POSTED 9/11/24

(sunflowers follow the sun on mountain landscape)

Acrylics to wrapped Canvas (11x14x1)

$159

Plum Satisfied / Florals

(hydrangea & foxglove bouquet)

Acrylics to birch panel (6x6x1)

$32

Delightful Joy / Florals

(fuscia hollyhocks on green)

Acrylics to paper mounted, matted, framed under glass (14×18)

$122

Fenced Posers / Florals

(Wild red roses along vintiage pickets)

Acrylics to paper-mounted, matted, framed under glass (14×18)

$122

SOLD Grateful Beatitude / Florals

(coneflowers on green framed)

Acrylics to paper, mounted, matted, & framed under glass

8 x 10 framed to 12 x 15

$122

Sally’s Song / Florals

Acrylics to birch panel framed (9×9)–Gerbera daisies & fern bouquet

$152

Drops of Sunshine / Florals

Acrylics to birch panel / 8 x 8 x 2

(White jasmine bouquet on vintage table at window)

$96

For the Birds 2 / BIRDS

Acrylics to wrapped canvas (16x24x1)

bird in tree boughs

$179

Song of Dawn / BIRDS

Acrylics to wood panel (8x8x2)

Chickadee in blossoms of a tree

$96

SOLD Lady Sparrow / BIRDS

Acrylics to wood panel (8x8x2)

Sparrow among Queen Anne lace

$96

Long Shadows / BIRDS

Acrylics to wood panel (8x8x2)

chickadee in golden light

$96

Little Birdy / BIRDS

Acrylics to wood panel (6x6x2)

titmouse peering over shoulder

$54

Lonesome Night / BIRDS

Acrylics to wood panel (6x6x2)

chickadee perched on berries

$54

Reality Check / BIRDS

Acrylics to wood panel (6x6x2)

Orange Rufus Towhee in grass

$54

Simon Says / BIRDS

Acrylics to wood panel (6x6x2)

tufted titmouse peering down

$54

Sorrowful Morn / BIRDS

Acrylics to wood panel (6x6x2)

solitaire chickadee in cherry tree

$54

SOLD The Way Home / BIRDS /

Acrylics to wood panel (6x6x2) /

titmouse on branch at dusk /

$54

Serenity Snap / BIRDS /

Acrylics to wood panel (6x6x1) /

sparrow in tall grass /

$32

Blue Dazed / BIRDS

Acrylics on wood panel (6x6x1)

titmouse in berries

$32

SOLD Whoo Goes There? / BIRDS

Acrylics to Birch panel (6x6x1)

screech owl in autumn woods

$32

  • Sweet Jenny / 5×5 card w envelope / $3 each or 2 for $5
  • Just a Struttin’ / 5×5 card w envelope / $3 each or 2 for $5
  • Clyde Says / 5×5 card w envelope / $3 each or 2 for $5
  • Rooster Grape / 5×5 card w envelope / $3 each or 2 for $5
  • SOLDOUT Party of Two / 5×5 card w envelope / $3 each or 2 for $5
  • Mr. Poke / 5×5 card w envelope / $3 each or 2 for $5
  • Mrs. Peck / 5×5 card w envelope / $3 each or 2 for $5
  • Hello Sunshine / 5×5 card w envelope / $3 each or 2 for $5
  • Ray the Rooster / 5×5 card w envelope / $3 each or 2 for $5
  • SOLD OUT Miss Pat / 5×5 card w envelope / $3 each or 2 for $5
  • SOLD OUT What She Said / 5×5 card w envelope / $3 each or 2 for $5
  • SOLD OUT Jumbalaya / 5×5 card w envelope / $3 each or 2 for $5
  • SOLD OUT Squatter / 5×5 card w envelope / $3 each or 2 for $5
  • SOLD OUT Gretta Spoke / 5×5 card w envelope / $3 each or 2 for $5
  • SOLD OUT Flossy Goes / 5×5 card w envelope / $3 each or 2 for $5
  • SOLD OUT Good Morning Sunshine / 5×5 card w envelope / $3 each or 2 for $5
  • OUT OF STOCK Zombie Chick / 5×5 card w envelope / $3 each or 2 for $5
  • OUT OF STOCK Hen Party of Two / 5×5 card w envelope / $3 each or 2 for $5
  • OUT OF STOCK Chicken Blues / 5×5 card w envelope / $3 each or 2 for $5
  • OUT OF STOCK Fat & Sassy / 5×5 card w envelope / $3 each or 2 for $5

Ask about Custom Art Kits by Becca when you check out.

Fun Sewing Lessons for Little Girls

My first machine!

My first machine was a Singer Treadle

I have two sisters who showed absolutely no interest in sewing when we were kids.  On the other hand, I was very intrigued with my grandma’s ability to make things by sewing. I spent a lot of time at her house in Georgia during summer vacation. I would stand by her side, aching to sit at the machine and make it hum for me.  My mother also did a lot of sewing when I was growing up. She didn’t let me stand at her side and watch too long, however. Probably because I drove her crazy with questions.  I would watch her from the door of the sewing room in our basement.  When she got up from the machine, i would run and sit at it, pretending to sew.  (I couldn’t have been more than 7 years old.)

I learned to use a sewing needle and thread at an early age (5) because my Grandma had patience to teach me during summer vacation, and I’m sure I would have bugged her to death had she not let me try. I got the hang of it pretty quick from what I recall. I made so many doll clothes that summer, I could hardly fit them in my suitcase when it came time to go home.  A few years went by and my interest in sewing never waned, so my daddy surprised me with my very own sewing machine. It was a gift from an old friend of his who had an antique Singer machine, operated by a foot treadle. That winter, my mom finally bought me my very own sewing kit, equipped with a pair of shears (fabric scissors) and tailors chalk and a pack of needles and some thread and marking paper.  I was so excited to use all of it right away.  Mom and I went to the store to buy a pattern for me to try. I was well on my way to my very first machine sewing experience. I’m sure that I was literally jumping up-and-down.

With this experience fresh in mind, I launch into a new teaching venture for my Summer Art Camp classes.  I have presented 6 different lesson plans for a variety of textile lessons for little girls to have fun with sewing this summer during the Blue Ridge Mountains Art Association’s BRMAA Summer Youth Art Camp

Last week, June 23-26, 2015, was the first week of Summer Art Camp and my Sewing with Felt class was a big hit with five students ranging in ages 6-10.  We made rice filled, pocket size, hand warmers by sewing together felt pieces and filling them with grain.  Simple hand sewing techniques were taught. They learned three basic stitches: straight stitch, back stitch and whip stitch. We had fun making them into penguin and kitty cat shapes.(Penguin project) (Pocket Kitty Image) We also made a handy little pouch in the shape of an owl adding a ribbon strap for carrying (Owl Pouch image from Pinterest, Joanns.com).  Glitter glue was used to decorate the owl pouch when the students finished sewing it up. All girls love glitter! The younger students had to have some help when it came to threading the needle and knotting the thread, but the three older students caught on quickly.  All of them completed their projects gleefully and displayed them for photographing as you can see below.  Two students continued to practice their straight stitches by creating pouch bags using ribbon and felt to carry all of their creations home after Show-and-Tell on Friday.  It was a very fun group to teach.

This slideshow requires JavaScript.

Stay tuned for more as the classes fill up and continue through the month of July, 2015.

‘Peek-a-Boo’ Post: Chic & Shabby Sari Silk Fringed Bags

Chic and Shabby Sari Silk Bag

Chic and Shabby Sari Silk Bag

I will be very busy this month and next, creating new stock for the fall festival in October. So, today I decided to go ahead and write a ‘peek-a-boo’ post to share my latest craze–sewing w/sari silk.

These little bags are gonna be all the rage this fall, so…..do you want to know where they will debut?  Read on!

Chic and shabby bags made from up-cycled sari silk and vintage textiles! My latest creation… and inspiration …for fall festival preparation.  Since my Flapper Bags, aka/ https://www.etsy.com/shop/greencraftstudio/ (Shabby Country Chic beach/tote bags), have been so popular–online and locally–I chose to create another Chic and Shabby bag to debut at the Mountain Moonshine Festival in Dawsonville, Georgia on October 26-27, supporting Kare for Kids charity (www.kareforkids.us/festival.html)

The Flapper Bag is a large fully-lined, machine washable, tote style bag with layers of horizontal, ragged ruffles sewn into the front of it. Its a real shabby, country chic look. This new shabby bag is much smaller and designed with busy, shopping divas in mind.

Chic & Shabby Sari-Silk Bags come with or without an inside pocket, a flap-over closure, and a removable, cross-body strap. The entire bag is covered in 1 or 2″ strips of  hand-dyed,  sari silk ‘ribbons’ by sewing vertically across the strips, attaching them to the ‘body’ of the bag. (The bag shown in the image is a proto-type; or the first one I made from this new, used material.)

Don’t you just love the raggedy fringe at the bottom of the flap?  The sari silk ‘ribbon’ was purchased from a supplier who up-cycles the product and sells it as ‘yarn’ or ‘ribbon’ online @ Etsy.  (I am so happy to find a supplier who feels the same as I do about using products to keep them out of landfills.) Let me know what color you would like to see for fall… check out all the many color-ways available @Etsy: https://www.etsy.com/shop/FeltBetter. As a matter of fact, tomorrow, I will place a custom order button for this new bag in my Etsy shop. All of you who read this blog will get free shipping when you order 2 or more of these bags, use this coupon code (FREESHIP2) when ordering now through November 2014.

Painting on Fabric: Is it durable? Washable? Permanent?

My studio has changed its focus lately, or at least a corner of the studio that is.   I have been wanting to paint sunflowers for a while now and went to work on this apron prototype last week.  The results are fabulous! I hope to answer as many of your questions as I can in this week’s craft blog.  However, do not hesitate to comment with a question at the bottom if I happen to leave your’s out. 🙂

Sunflowers are popping up all over the landscape here in North Georgia this month. Seeing them in all their glory moved me create my own canvas (apron fabrics) covered in sunny flowers. My artist friend, Sue King, does this all the time. She paints pillows and aprons using items from nature like leaves for stamping on neutral cloth.  She heat sets the paint after it dries. I hesitated to do this technique in the past because i didn’t think it would be very durable. Turns out it is very durable. Sue showed me how durable it is when I realized how often she uses and then washes her painted tablecloth–its white cotton  with leaf stamping in burgundy, browns, rusts, & greens.  

I searched magazines and books and images on the web for ideas for sunflower designs and color.  I had some green burlap to use for a ruffle trim on the apron and used that color green in the center of my design.  I also painted the ‘seeds’ so that the fibonacci pattern was evident.

 I wanted it to be somewhat realistic, but not perfect. I found a simple outline drawing in a color book to be the most useful when I began the process on the fabric.  I sketched the design onto craft drawing paper to use as a visual aid as I worked on the fabric with the paints.  I colored it with oil pastels.  It seemed so easy to do, I was ready to begin on the fabric.

Sketch the design and color it.

Sketch the design and color it.

I cut out several aprons from a lightweight ivory fabric in the studio stash pile.  I taped it to a board to keep it smooth as I worked with it. That tip came from watching Sue in her studio.  I sketched the design to the cloth, enlarging it from my drawing.  And then I gathered the tools for the painting process and mixed my color palette. Before long I was fully absorbed in the process of creating my first sunflower apron.  After I finished the first, I couldn’t stop. I was having too much fun to call this work! Which is why I love working in my Green Craft Studio. I get to make things that I love for others to appreciate and then love.  

As I work on my second sunflower apron, a memory floods my mind and won’t let go. Its a memory of a photograph of my first home grown sunflower plant. (Here I am at the end of Summer 2014, creating a sunflower on fabric, and this memory pops up like the sunflowers I see in my current landscape.) The memory is vivid, and it moves me to add another dimension to this apron. A dimension that was not in my design drawing. It’s a ladybug!  I didn’t see the ladybug until after we got the film developed.

It's a LADY BUG!

It’s a LADY BUG!

Sunflower aprons 1st

The added apron detail of the ladybug called for a red pocket accent to which I added a fabric flower applique to set the whole apron off. The green burlap ruffle trim finishes it perfectly. 

   Sunflower aprons 2 Painted aprons sunflower appliqSunflower apron

As far as the painting process goes, I started off using tiny brushes and then moved on to a tiny sponge roller for the big sections and the background coloring.  The tiny flat sponge applicators worked well for the wide outline around the seed center.  Paper plates and plastic spoons worked great for mixing the palette.  I used acrylic craft paints in a matte finish. After the painted fabrics dried I heat set each painting from the back of the fabric using a low heat iron. I then washed them in cold water in the washing machine to test the paints.  Durable! I dried them in the dryer and pressed them out before finishing the details of the pocket, trims and ties.  One of these is going in my Etsy shop and another is going off to be reviewed for a blog feature in November. Elizabeth of Building Bridges Marketing was nice enough to reach out and I am excited to see what she says about my prototype painted aprons. November 16 is my feature date for her blog, so look for my Etsy shop feature article and read the review. It’ll be my first professional review and, quite frankly, I am on pins and needles! 

Introduction

becky portrait

Creative Engineer: Becca Shuler

Midwestern by birth, Southern by Heritage: Parents and Grandparents hale from Alabama

Informal Education: Hands-on:  Sewing clothes to quilts, draperies, artistic decorating & specialty painting techniques. Mom & Grandmother (longtime crafters) taught me everything they know.  What they didn’t know, my Aunt taught me! The love of Crochet!

Formal Education: College: 1995 Highest Honors Grad.; North Metro Technical College, BOT; Acworth, GA

Experience: Entrepreneur, Designer, Teacher, Manager

My husband and I relocated from the bustling city of Woodstock, Georgia in 2000 to Ellijay, Georgia. We so wanted to slow our pace, and what better place to do that than up here in the mountains of North Georgia where creative folks thrive! We opened our very own retail business, Cottage Interiors. It was a fabric shop devoted to quilting and drapery making. It held its own and prospered until the year 2005. Although that business closed, we still are entrepreneurs. My husband owns and operates an Air Duct Cleaning service business and continues to try his hand at creative writing, compiling a book of poetry for publication in the near future. If I’m not out working for others around their homes, then you’ll find me busy in my Sewing Studio, working on new creations to sell at the local shops and markets.